Last night the Jolly Broom Man and I did a Zoom replay of a game I played earlier in the month in a face-to-face session with Ian here at Chateau Foy. The intention had been to do the remote version a couple of days before Ian's visit, but Real Life stepped in and we had to postpone.
I still had all the drawings and photos from the session with Ian, so I rebuilt the table and lined up the troops, and the JBM tuned in from France (which, for those who cannot remember, is in That Europe) at 7pm his time, 6pm for me. My beloved broadband supplier, Lothian Broadband (let us name names here), did their level best to screw us up, but apart from the odd freeze and one brief picture blackout we were fine. The sacrificial goat was worth the expense.
I commanded the French attackers, JBM had the Allied defenders. Here is the scenario note, along with the OOB.
Action at Teufelsee, late 1704
The Battle of Blenheim has been fought, the Elector of Bavaria has disappeared from the scene for a while, though some part of his army has escaped back towards France with the remains of Tallard’s French army. They are pursued by the combined might of the Allied army.
Our action comes as the Allied force nears the Rhine, close to Philippsburg (not far from modern Karlsruhe). The army has divided; part of it, under Prince Eugene, is destined to lay siege to the fortress of Landau, while the remainder, with the Duke of Marlborough commanding, will force-march into French territory (eventually to capture the town of Trier [Trèves], and then march down the Moselle valley to capture Trarbach).
This much is pretty historical, but in our game Eugène’s force is surprised by another French army, under Marshal Villeroi, which was stationed on the Rhine, and which has been augmented by the arrival of some of the survivors of Blenheim.
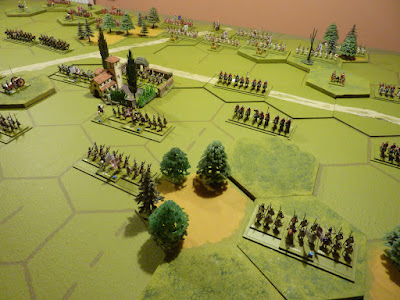
The battlefield can be seen in the supplied photos; the French force is attacking from the side of the table with the sections of the river Treich and a lake known locally as Teufelsee – Devil’s Lake. The lake is impassable, the river may be forded.
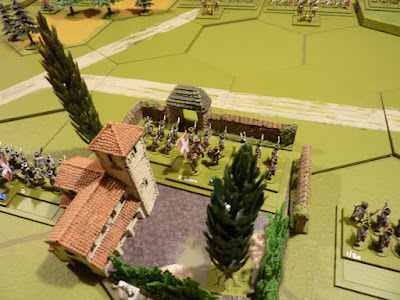
The building near the centre of the table is the convent of St Ursula of Lorraine, which is classified as a built-up area.
We are playing Version 1.02 of my Corporal John rules. Each commander gets 6 Command Cards and an initial allocation of 3 Combat Cards. The Preliminary Bombardment rule is in play (artillery on both sides has been carefully positioned so that the 2-hex withdrawal is a possible option!).
There are temporary bonus VPs available thus:
* 1 for either side in possession of the convent
* 1 for the French if they get a unit on either of the two Allied hills (that’s 1 VP for each hill, not each hex)
9 VPs for victory. The French go first throughout.
The French army has 3 elite cavalry units – the Bavarian Leibgarde zu Pferd and the two bits of the Gendarmérie de France.
The Allied army has 1 elite infantry unit – the British Foot Guards.
The “Reserve” identified in the French OOB is simply the rear line of infantry in the centre. The Allies have 3 Austrian and 3 British battalion guns to attach to infantry units. Only British infantry are trained in platoon firing.
French Army (Marshal Duc de Villeroi)
Left (Generalmajor von Weichel)
Leibgarde (3 Sqns) (Bav)*
Arco Cuirassiers (3 Sqns) (Bav)
Weichel Cuirassiers (3 Sqns) (Bav)
Regt du Roi (3 Sqns)
Regt Grignan (3 Sqns)
La Vrillière Dragoons (3 Sqns)
Centre (Lt General Marquis de Clérambault)
Regt de Champagne (2 Bns)
Regt de Toulouse (1 Bn)
Regt de Béarn (2 Bns)
Regt de Navarre (2 Bns)
Regt du Dauphin (2 Bns)
Reserve (commanded by Villeroi himself)
Regt de Languedoc (1 Bn)
Regt de Nettancourt (1 Bn)
Regt de Poitou (2 Bns)
Regt de Saintonge (1 Bn)
2 field batteries
Right (Lt General Comte de Zurlauben)
Gendarmérie de France (6 Sqns)*
Regt de Tarnault (3 Sqns)
Regt de La Baume (3 Sqns)
Regt de Lavallière (3 Sqns)
Regt Mestre de Camp Général (3 Sqns)
Monasterol Dragoons (3 Sqns) (Bav)
Confederation Army (Prince Eugène of Savoy)
Left (Lt General Earl of Cadogan)
Lumley’s Horse (Queen’s Regt) (3 Sqns)
Cadogan’s Horse (Earl of Shrewsbury’s Regt) (3 Sqns)
Wyndham’s Horse (Queen Dowager’s Regt) (3 Sqns)
Wood’s Horse (Earl of Plymouth’s Regt) (3 Sqns)
Schomberg’s Horse (Duke of Leinster’s Regt) (3 Sqns)
Hay’s Dragoons (Scots Greys) (3 Sqns)
Centre - Austrian Infantry (commanded by Eugène)
IR Gschwind (2 Bns)
IR Thürheim (2 Bns)
IR Alt-Salm (1 Bn)
IR Palffy (1 Bn)
Centre - British Infantry (Lt General Lord Cutts) (each 1 battalion)
Regt of Foot Guards*
Chas Churchill’s Foot (The Buffs)
Ferguson’s Foot (Earl of Angus’s Regt)
Scrope Howe’s Foot (Wm Clifton’s Regt)
Rowe’s Foot (Scottish Fusiliers)
2 field batteries
Right (Maj General Graf von Fugger)
Cusani Cuirassiers (3 Sqns)
Alt-Hannover Cuirassiers (3 Sqns)
Jung-Darmstadt Cuirassiers (3 Sqns)
Gronsfeld Cuirassiers (3 Sqns)
Aufseß Dragoons (3 Sqns)
* units marked thus are of elite status
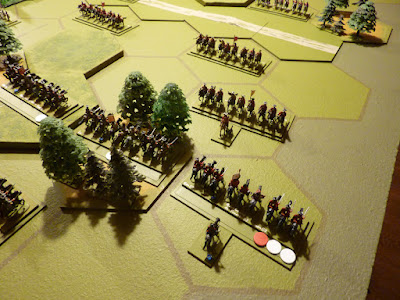
The narrative of the action should be discernible from the photos; I am very pleased that my camera, which was suffering a fit of the sulks when Ian visited, appeared to be in better spirits last night.
The game went very well; even with me blethering on (as ever) and Lothian Broadband doing their best to freeze us out, we were finished by about 9:45pm, which is not bad going for a remote game starting at 6pm. No problems with the rules, apart from having to look up the details of how to play though some situations we hadn't met before [how do you attack a lone general? can cavalry opt to Retire and Rally on a Bonus Combat?...]
One thing I might usefully look at in the rules is the possibility of a better index. Otherwise no worries. My sincere thanks to JBM for his company, his fortitude and his enthusiasm. An enjoyable game (and a rather stunning victory!).


Well done on the victory Tony. Sounds like the rules are a success too.
ReplyDeleteThanks Chris - it would be appropriate to smile modestly and wave to the gallery, but I have to say I was embarrassingly lucky with the dice at the end. These rules, which are derived from "Tricorne", turn up all sorts of surprise disasters as units decide they have had enough. Foot Guards, French Household troops, whatever. We've played enough games now for some regiments to be getting a reputation, in particular the Austrian IR Gschwind and the Franconian Aufseß Dragoons, who tend to get homesick very suddenly at awkward times.
DeleteJust the dice and some daft men playing a game, but very good fun!
Very attractive game and good deal to get a sizeable Zoom game done in under 4 hours, Internet challenges and all!
ReplyDeleteHi Peter - all went very well. The broadband thing was a bit knife-edge throughout, but we got there. When I was testing my two-camera set up before we started, it looked OK except that the view on my 2nd camera (which attends as a "remote" participant) was obviously getting buffered - I could wave my hand and watch it happen up to 4 seconds later, and my hand wasn't even in France.
DeleteStatic view of soldiers on the table wasn't affected, fortunately, though speech was halting at times, and when you get delays like that you tend (well, I do) to waste further time by interrupting each other.
Indeed it was very good fun! Knowing when not to push success too far is something I need to learn. I’d noticed the empty air where my right flank cavalry used to be and had just drawn a card that would allow me to cover my lonely general and the yawning gap in front of him when it became your turn. Up until this point your lads had been moving at a glacial pace and I had become complacent. The first cavalry you got across the river dashed up the empty flank like a rat up a drainpipe and the next thing I know General Fugger (the silly Fugger) is handing over his sword. After that you skilfully exploited the consequences of my over ambition and I watched in disbelief as your pile of victory counters began to grow. Excellent game, excellent rules, excellent company. Kudos for a well earned victory.
ReplyDeleteVery good fun. Artillery was mostly useless, again, which is authentic, I think, but I am going to have another look at the terrain rules - and the Tricorne originals - to check on how artillery get on in more complicated situations - it didn't arise on Friday, but I think it is easy for artillery to become completely impotent in fairly commonplace circumstances, so I'll have a little think about that. It is more than likely that I will email with some daft ideas [heads-up]!
DeleteThanks again - as you say, very good fun. One of the great benefits I've had from exposure to C&C-related games is that they have done a lot to reintroduce the entertainment and excitement (and, especially, the speed of development) which I had hoped wargames would provide ever since my beginnings in the 1970s.
Excellent stuff, as ever - glad the rules are working well.
ReplyDeleteI was interested that the OOB numbers squadrons and battalions, as the commanders of the time would have. How do you relate that to units on the table? For foot, I imagine a unit is one battalion - for cavalry, is it one 'strength point' or C&C 'block' per squadron? ( I see that 6 squadrons of Gendarmerie make 2 units, if I've got that right )
Hi David - yes, you're right. My basic approach for these games is that adjusting the size of the regiment to match historical records (or something) is too complicated for me!
DeleteMy battalions are (3 stands) totalling 18 figures or 600 men - same for all nations, which means the 3 stands might represent varying numbers of real companies - I don't worry about that. My cavalry units are (crudely speaking) "regiments", where the 3 stands, by good fortune(!), represent 3 squadrons, or 9 figures, or 300 men, which is a decent average size for units of most nations on campaign at this time. Occasionally the regiments of French household troops or the Austrian and Bavarian cuirassiers fielded 6 squadrons together - easiest for me is to represent these as two "units", which can be brigaded together and just provide a second line as necessary. The French Gendarmérie are the only example I have thus thus far, but I have some extra figures for the Germanic cuirassiers, so will get into that sometime soon.
My approach isn't at all scientific; if I'm trying to replicate a historical army with a known size, I'll tweak the number of 600-man infantry battalions and 300-man (3 squadron) "cavalry regiments" to get the right overall numbers. Other approaches, of course, are possible and recommended elsewhere!
I had a late comment by email from Monsieur Sarrazin, pointing out that Clérambault is a surprise inclusion in the OOB, having been drowned a few weeks before at Blenheim. My compliments to him; I can only comment that, once again, it is demonstrated how little we can trust the biased records of history, and claim that in its small way his presence at Teufelsee gives us all a little hope.
ReplyDelete