I had limited time available this evening, but was keen to bring the Test Siege to some kind of conclusion, however predictable!
First of all I must offer thanks to Pyotr and Martin, who emailed me pictures of what a proper head of sap looked like. If I can identify some suitable figures in small 20mm, I could make up a couple of little set pieces. I could convert a couple of the Les Higgins ECW gunners, though they are a bit upright. I've had a look at various plastic sailors and pirates and so on - nothing obvious - I'll keep it in mind. Anyway, thanks very much - here's what yesterday's picture should have looked like.
 |
| Cross section view of a head of sap - notice how the follow-up men cut it deeper |
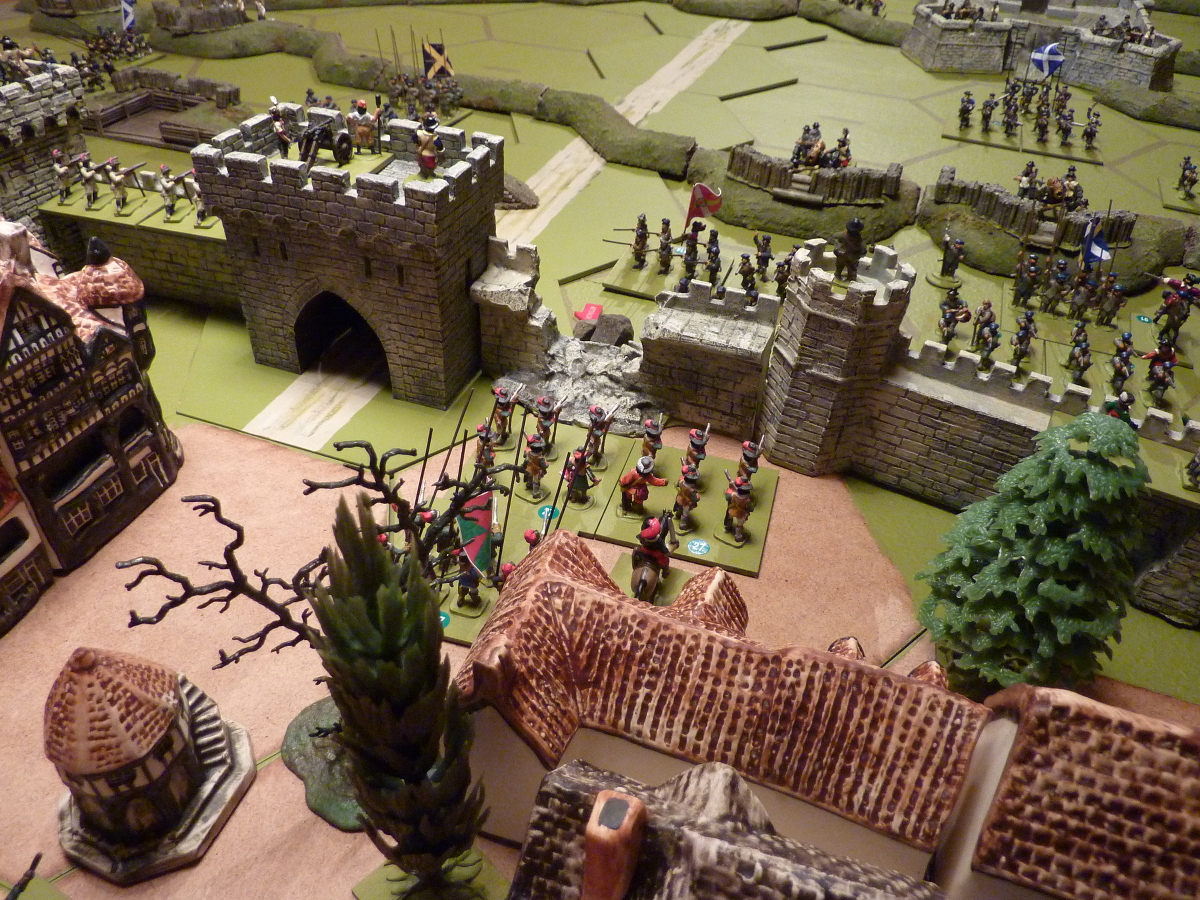
The Test Siege of Middlehampton resumed with a few tactical turns initiated by the Scottish attackers; they quickly eliminated the cannon in the defenders' external earthwork, and drove the trained band musketeers away - the militia status of the trained band men requires them to take triple retreats, which simply eliminated them, since they had nowhere to go - presumably the survivors just ran away into the countryside.
Back to strategic turns - the big Scots siege cannons opened fire at close range on the old curtain wall, they soon started to cause damage, but in fact it took 3 days of steady fire before the wall collapsed.
 |
The militia have mostly scarpered, and the damage chips are beginning to
accumulate against the wall |
Tactical again. George Heriot's Regt of Foot stormed the breach, drove back Sir Henry Spale's Foot, and then broke the last intact Royalist Foot regiment, that of Col Leonard Winthrope. The Stockgate was opened, and the Scots streamed in. General William Baillie, the 2-in-C of the Scottish army, met the distraught Lord Bloat at the Market Cross, and accepted both his sword and the surrender of the town.
 |
| Eventually, the wall falls, and Heriot's RoF storm the breach |
 |
| Spale's Foot attempt to stop them... |
 |
| ...but the Scots break into the Market Ground and drive off all attempts at resistance |
 |
| With all his Foot troops eliminated, Lord Bloat surrenders to General Baillie |
 |
| And the Covenanters march in - a total of 22 days from arriving on the table |
 |
The garrison lost about 3200 men, including 1700 prisoners; the besiegers
around 500; the townspeople suffered about 200 casualties |
 |
| Middlehampton is now for Parliament, gentlemen - better get that wall fixed |


Were there no secondary defences behind the breach?
ReplyDeleteGood question - I'll cover this in my afterthoughts post!
DeleteGreat looking setup. I've used the same cross-section image to produce a 28mm model of a sap which I'm still working on. Next will be a mine entrance.
ReplyDeleteExcellent - yours is one of the blogs I was going to have a squint at to see what siege stuff you have listed - must get to that. Thanks - a mine entrance is good, too!
DeleteYou might want to wait a few weeks before checking my blog ;) I'm running way behind schedule with all my projects.
DeleteThanks for sharing, I have enjoyed reading about this siege.
ReplyDeleteApart from looking magnificent this series of posts has been entertaining, informative and thought provoking. Thanks very much for sharing, the forces of the King, if any survived the post capture celebrations, could do with a stern talking to.
ReplyDeleteThe town is lucky that it was sober Scots who stormed the breach without sacking the town.
ReplyDeleteI'll wait on closing arguments but from here it looks like a successful 1st test.
A bit behind the times with this comment but this is a very interesting series of posts. Thanks! The game really, really looks sharp.
ReplyDelete